


Three steps: Domain registration, hosting rent, CMS installation
1. Domain
The domain name of the site is the url of your future site, the address that will need to be entered into the address bar of the browser to get to the site, links to all pages of your site will begin with it. Example: unila.ru - domain and main address of this site.The domain must first be registered.
Registration is paid, the cost depends on the company in which you register the domain and the domain zone (two or three letters after the dot). For example, domains in the .ru zone are usually cheaper, domains in the .com zone are usually more expensive.
Your domain rights will need to be renewed every year. Renewal is also paid.
In some companies, domain renewal costs the same as its initial registration, in some companies the initial registration is cheaper than subsequent renewal.
You can register a domain at special registrars, in companies whose main profile is domain registration.
Examples: Russian registrar reg.ru, its partner 2domains.ru or well-known international domain registrar godaddy.com
You can also register a domain with a hoster.
A hoster is a company that provides hosting - a place to physically host your site.
Registering a domain not with a hoster but with a registrar may sometimes be preferable because of the difference in tariffs or because of the desire "not to put all your eggs in one basket."
Registering a domain directly with a hoster is more convenient because instead of two accounts (an account with a registrar and an account with a hoster) you only need one account with a hoster - he is a registrar, and pay "in one cash desk".
In addition, many hosting companies that also provide domain registration services offer initial domain registration (for the first year) for free if you pay for hosting services (renting space for the site) immediately for a year in advance.
And one more convenience of domain registration in the same place where you rent hosting - automatic configuration of NS records in the desired direction.
NS records are pointers that link the domain name of your site to the ip-address of the server where the site files themselves are located.
When you register a domain in one place, and rent hosting in another place, during domain registration you need to specify in the domain settings at the registrar those NS records that the hoster told you when you rented space for the site from him. Something like this: ns1.myhoster.com, ns2.myhoster.com. A few hours after specifying these parameters in the domain registration settings, the entire Internet will know that your site is hosted by the myhoster.com hoster and you need to look for it there.
When you register a domain with a hosting provider, usually by default it immediately offers you the correct domain settings (NS and DNS records) that allow you to associate your domain with your site hosted here - on the hosting and which will lead the visitor in the right direction.
Domain owner data privacy. If privacy protection is not enabled, the data of the domain owner becomes public. Anyone can find out the name, surname, address and telephone number of the site owner. In principle, it's okay, but there will be more spam in your mailbox and unnecessary information for potential intruders.
For domains in the .ru zone, the domain owner's privacy protection service is usually provided by default and free of charge. If you choose a .ru domain, most likely you do not need to take any action to hide your data. For domains in other - international zones, you need to see the conditions on the spot when registering. Often you have to pay extra for this service.
So, for the site to work, you need a domain, the domain needs to be registered and renewed every year.
After registering the domain, you need to configure it - specify the NS server where the site will be physically located. This data is provided by the hosting. If the domain and hosting are ordered in one place, the correct settings are usually set by default.
After registering the domain, you need to configure it - specify the NS server where the site will be physically located. This data is provided by the hosting. If the domain and hosting are ordered in one place, the correct settings are usually set by default.
A domain is just the name and address of the site. To host the site itself, we need hosting.
2. Hosting
Basically, you could host the site on your computer at home too ...To do this, you need to install and configure special software on your computer that will allow the site with all executable scripts to be launched and displayed in the browser, connect your computer to the broadband Internet and get a static permanent ip address for your Internet connection, configure your domain to link with your ip address. It remains to keep the computer turned on around the clock so that access to the site hosted on your computer is not interrupted. In general terms, this is how it could be organized. It is possible, but in practice it is difficult.
Most site owners simply rent space for their site on hosting. When ordering hosting, you rent space on the server, which plays the role of that computer. It is turned on and in touch 24/7, so that anyone who wants to at any time of the day or night can "get through" to your site. And there are also technical specialists who make sure that the "computer" is working properly around the clock.
That's what hosting is for.
Hosting rent is the second key stage of website launching after domain registration.
1. Choose a suitable hosting
2. Create an account, choose a tariff plan according to your needs. Tariff plans differ in price, the amount of hard disk space that is allocated for your site and the system resources (RAM) that your site can consume. If you exceed the resources of your tariff plan, the hoster may temporarily disable your site.
3. If you have already registered a domain, after activating your account on the hosting, receive technical data from the hosting and configure the domain according to the instructions of the hoster in order to link the domain with files on the hosting. If you do not have a domain yet, you can register it immediately when ordering hosting (if the hoster provides such a service).
After registering and configuring a domain, it may take from several minutes to 24 hours for the specified domain settings to be applied to all ISPs.
Until then, you can wait or use the temporary technical site address provided by the hoster (if provided). You can also temporarily add an entry to a file on the C drive: /windows/system32/drivers/etc/hosts
XXX.XXX.XXX domain.tld
here XXX is the ip address given to you by the hoster, domain.tld is your domain. If this file already contains some records, just add your own on a new line. Thanks to this entry in the hosts file, you can start working with a hosted site without waiting for the domain settings to take effect. On your computer (and only on it), the domain will already be directed to the server where you are going to host your site.
4. After the hosting is activated, and the domain is registered and configured, you can start installing the site.
If you already have a ready-made website, you can upload it to hosting (via ftp or a file manager in the hosting control panel), if you don't have a website yet, you can start creating it directly from the hosting panel.
3. Website building software.
You can write a website in any text editor, for example, in a notepad. But this is aerobatics, available only to those who know well html tags, layout, language for managing styles - css, most likely, knowledge of the programming languages java script, php is also required. Few site owners have all the necessary skills to create a website by writing all the source code themselves.Fortunately, there are other options.
Firstly, there are website builders, these are online services that provide customers with the ability to assemble a website "on the fly" from ready-made modules. As a rule, sites created on the platform of one of the online builders are hosted on the hosting provided by the online builder itself. If you are going to go this way, in principle, the content of this article, with the exception of the section on domain registration, is not of interest to you. Register in the website builder service, choose a template and start assembling the site and filling it out.
It should be borne in mind that when placing a site on the constructor, you may encounter a number of restrictions that the service sets. In addition, in some cases, sites created on the website builder platform can be difficult to transfer and run on a regular hosting, if one day you suddenly decide to leave the service and go with your site on an independent voyage. Even if the website builder provides an opportunity to download an archive with its site, there may be some problems with further maintenance, site content and compatibility issues when trying to link your site to one of the content management systems.
Content Management System (CMS for short) is exactly the thing that is used by most of the owners of private sites in the world. CMS is an online application, a blank for creating your website based on it.
After installing the CMS on the hosting, you get an almost ready-made website in working form and access to the admin panel, where you can customize the site description, site menu, create site sections.
Adding articles and photos using the CMS panel is as easy as adding a new post on a social network ... well, or almost is just as easy - at first it can be difficult to show, but nevertheless, to figure it out you do not need to have special knowledge and skills in this.
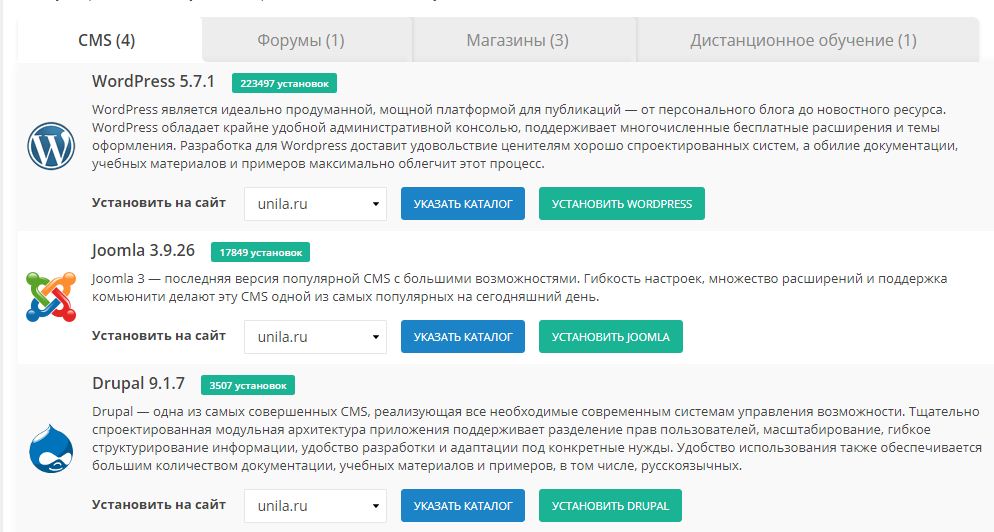
The most popular free CMS in the world today are probably WordPress and Joomla.
And good news for inexperienced users: you can install the CMS directly from the hosting control panel. Any normal hosting provider today offers customers the opportunity to install a CMS on a website in two clicks.
That is, your path to the beginning of filling the site may look like this:
1. Register a domain
2. Took hosting and linked your domain to it
3. In the hosting panel, we found the application installer, chose one of the CMS.
4. In three minutes, your site is ready. You can open it and rest a little.
5. Have a rest? Now you can start filling the site, open the admin panel of your site, study how everything works, understand the menu, options, and try to add the first article.
If your site will consist of only one or a dozen static pages, and the ability to scale it in the future is not necessary for you, you can use another option. There are programs - visual editors for creating sites that are installed on a computer. You create site pages in a visual editor and add elements to them, the editor converts this into the correct html, css, java-script code. As a result, a folder with ready-made html pages and auxiliary files appears on your computer, which you then just need to upload to the hosting.
An example of such programs for a Windows computer: Adobe Dreamweaver, Adobe Muse, Mobirise.
This option is suitable if you need to build a simple site with several pages and you will not frequently update it, add new content, you do not need functions such as user registration, comments, a forum, you do not need to store large arrays of data in the database, and then search and sort this information.
By the way, even on such a site consisting of static pages, you can add a comment option, but in this case you will need to use external resources. For example, you can insert the comment code for the site from the Vkontakte section for developers. In this case, you simply add a small java script code to your page, and the entire technical side of the issue is further resolved on the Vkontakte side, comments are stored and processed there. You can add a simple feedback form (you only need one php script that will process and send a message from the form to your email). Buttons "share on social networks" or chat to communicate with customers can also be added. Buttons "share on social networks" are a small java script that you take on a third-party service and insert into your page, the support service chat, in this case, is also an external service and a small html code that needs to be added to the page.
If you are planning something more complex, it is still better to use a CMS and all kinds of extensions for all cases to it, which can be installed as needed (in some cases - to buy).
If you don't know which free CMS to choose for your site, try installing WordPress first, then you can uninstall it and try to install Joomla, they both have great functionality and deserve attention, the question is rather which one will seem more understandable to you and more attractive.
It is worth noting that during testing and other preparatory work, it is better to restrict access to the site for search engine bots and other users so that the sketches of your site do not get into the search ahead of time. Until you are sure that your site is ready to go.
There are several ways to restrict access to the site pages for bots and visitors, the simplest is after installing the CMS, go to the admin panel and specify in the site settings that the site is disabled for visitors. You can also set a password for the root folder of your site during all preparatory work, this is done in the control panel on the hosting.
You can endlessly describe all the details and nuances of working with the site, but not within the framework of this publication.
These are just the basic steps to launching a new beginner site.
If any term used in this publication seemed incomprehensible to you, or if a point was mentioned in passing that you would like to analyze in more detail, you can continue to study the issue using a search on the Internet.